GitHub Electron Tutorial: Using Electron-Boilerplate
GitHub’s Electron framework allows you to leverage the best of web technologies in a cross-platform desktop application. This tutorial shows you how to build your first Electron app using szwacz/electron-boilerplate.
A few prerequisites:
- Git (I use the Git Shell packaged with GitHub for Windows)
- Node.js
- NSIS, if you are on Windows and want to build an installer
- Both Node.js and NSIS need to be in Path in Environment Variables (“C:\Program Files\nodejs\” and “C:\Program Files (x86)\NSIS” for me, again, on Windows).
- A text editor. I recommend using Visual Studio Code or GitHub’s Atom here: these apps are built on Electron, only because it is cool to use an Electron app to build an Electron app. Any text editor would work, though.
Electron-Boilerplate Quick Start
Note: this tutorial was written in July 2015. This was the most recent commit.
In your Git Shell, navigate to a working folder (mine is C:\workspace-git) and run these commands:
git clone https://github.com/szwacz/electron-boilerplate.git
cd electron-boilerplate
npm install
npm start
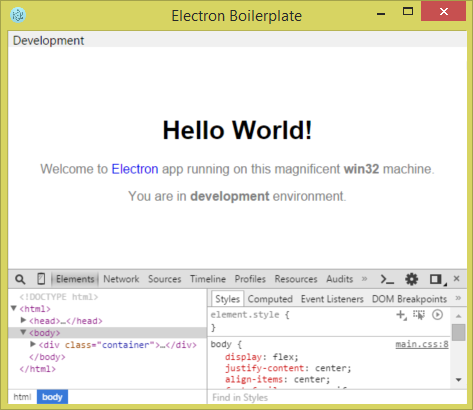
This should start your application!
If the npm command doesn’t work, make sure Node.js and npm.ext are in your Path.
Both “npm install” and “npm start” run a series of commands. I had a few warnings pop up on “npm install” but the packages were pulled down fine. Get used to the command “npm start” as this is the command to restart your development app after you close it.
Electron-Boilerplate Tour
Electron-Boilerplate contains everything you need to quickly build an app and even create installers on different OSes. I highly recommend it if you’re the type of programmer who likes to modify, tweak, or hack existing code rather than start from a completely blank page.
The only drawback is it can be a bit confusing to determine the difference between your Electron app and Electron-Boilerplate, particularly when you are writing your first app. Here are the basics.
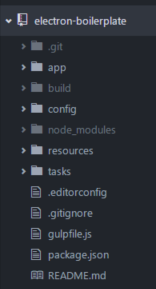
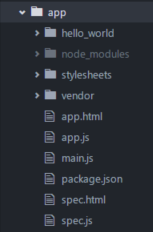
app
This folder contains the code (mainly JavaScript and HTML) that is your Electron application. It is important to note that there is a package.json in this folder; this is the package.json used for your application. The one at the root is for Electron-Boilerplate.
config
I didn’t modify the files in this folder. See app/vendor/electron_boilerplate/env_config.js for more information.
resources
Contains folders named linux, osx, and windows. Files here are used to create installer packages for your Electron app.
tasks
Contains Electron-Boilerplate code to easily build, start, and create installers for various platforms. You won’t spend much time in here, but this is where much of the Electron-Boilerplate magic happens. Familiarize yourself with these files after you have a better understanding of your Electron app.
Here are other folders that may not be there immediately:
build
Your app will be copied and run from here after you run “npm start.” There are also file watchers that will update this folder, even when the app is running. Don’t modify anything in this folder.
node_modules
Your Electron-Boilerplate node modules will be installed here after you run “npm install.” Don’t modify anything in this folder.
releases
Your app’s installer will be found in this folder after you run “npm release”.
The App Folder
You will spend almost all of your time in the app folder. Electron-Boilerplate comes with a very simple app configured, which we’ve seen already. Now let’s take a closer look at the code behind this app.
Things here are fairly straightforward. The main entry point to your app is main.js. This entry point is defined in the package.json folder. This code creates your app window (including remembering its previous size—handy!) and loads the app.html file inside it.
mainWindow.loadUrl('file://' + __dirname + '/app.html');
The business logic of your app will take place in app.js, app.html, and any other js or html files you might add.
By default, app.html launches app.js via a script tag.
<script>
   requirejs(['app'], function (app) {});
</script>
There are some other very handy functions provided by Electron-Boilerplate that come by default in your app. These are found in app/vendor/electron_boilerplate and used in main.js, app.html, and app.js.
- context_menu: provides cut, copy, paste in input fields and textareas
- dev_helper: a nice menu for developers, especially useful for your first app
- env_config: loads a config file based on context (development, production, test). I didn’t use these.
- external_links: open links ( tags) in the external browser rather than in your Electron app. You’ll need to do this, so use this helper rather than writing it yourself.
- window_state: remember the previous size of your app’s window
Your Electron App
Let’s start hacking. I had my single web page already up and running in Node.js. I copied all my js code (a single file, 200 lines) and pasted it into app.js. I also copied the bliss templates (.js.html files) over and put them at the root of /app.
Some of the Node.js functionality had to be removed. Remove the reference to http.createServer and the code to listen on a port. Change app.js to execute your code when it runs. Rather than setting output, modify the DOM of app.html as appropriate for your app.
Here is an example:
Node.js, controller.js:
var http = require('http');
var Bliss = require('bliss');
var bliss = new Bliss();
var server = http.createServer(function (request, response) {
template = bliss.compileFile("Index");
output = template("Hello world");
response.write(output);
response.end();
});
server.listen(80);
Electron, app.js:
var Bliss = require('bliss');
var bliss = new Bliss();
template = bliss.compileFile("Index");
document.getElementById('myContainer').innerHTML = template("Hello world");
Remove what you don’t need from app.js and app.html (in the). Edit thein app.html to change the name of your app’s window. Restart your Electron app either by hitting Ctrl+R in the running app (which will reload the app) or by running “npm start.” You should start to see progress.
You can debug your Electron app using Chrome’s Developer Tools and the logs that appear on your command line window (where you typed “npm start”). Chrome’s Developer Tools appear by default when you start your app, but you can change this behavior by deleting the line “mainWindow.openDevTools();” in main.js. You can toggle dev tools at any time using either the Electron-Boilerplate Dev Helper menu, or Ctrl+Alt+I.
A couple issues I came across in porting my app:
- ES6 Import: Electron uses the new ES6 import syntax for “browser modules.” What does this mean? It means if you have .js and you are trying to use it in app.js, you are not able to use “var module = require(“./myModule”).” Instead, you must use the ES6 import syntax. After some research and a few examples online, it was pretty straightforward for me:
In your js module, change:
exports.myFunction = function() { /*… */ }
To:
export function myFunction () { /* … */ }
In your app.js, change:
var myModule = require('./myModule.js');
To:
import { myFunction } from './ myModule.js';
- Images not copied to build folder: the tasks/build.js file contains an array of file types to copy during the build process (paths.toCopy). This, at first, does not contain *.png, *.gif, *.jpeg, etc. Modify this list as needed.
- External links: as highlighted earlier, this will be a problem. Chromium treats links as any browser tab would: click on one and it will take you there. Of course, the desired behavior is to open the link in the default browser. Luckily Chromium-Bootstrap has a solution for this: app/vendor/external_links.js. Just add that class “js-external-link” to any link you want to be external. I did this on a high-level parent element so all links on the page will launch in an external browser.
- CSS Styling: the file in app/stylesheets/main.less is your main stylesheet and by default it has styling that will probably conflict with your app. Change it accordingly. It is a .less and is compiled every time you reload the Electron app. If you don’t know about .less, just write normal CSS in this file and you’ll be fine.
Building an Installer
Once your app is working as you’d like, you can package it for installation on other machines. There are a couple ways to do this, the “basic Electron way” and the “Build an Installer with Electron-Boilerplate” way.
Basic Electron Way
Some basic Electron understanding helps here. Electron is runtime that contains a version of the Chromium browser and Node.js. Electron apps can be very easily packaged and run by copying your code to the resources folder in an Electron.exe install. If you’re just running the app on one machine, this might be all you need. More details on application distribution are found here.
Build an Installer with Electron-Boilerplate
Electron-Boilerplate contains scripts to build installers for various platforms. One caveat: you can only build a Windows installer on Windows, a Mac OSX installer on OSX, and a Linux installer on Linux. To run the installer on your respective platform, simply run “npm run release” and an installer will be created in the releases folder. I’ll cover the building of a Windows installer here.
Modify app/package.json with the desired name, author, and version number. All of these will be reflected in the installer and your app once it’s installed.
Modify resources\windows\installer.nsi if you’d like. You may want to change some of the language on the installation screens, for example.
Add app icon(s). Replace the icon.ico and icon.png to match your shiny new Electron application.
Finally, run “npm run release.” Building the installer can take a minute.
I did come across a few issues:
- Re-enable the dev toolbar so you can debug the installed app: This code in the app/main.js file will disable Dev Tools when not in development:
if (env.name === 'development') {
devHelper.setDevMenu();
mainWindow.openDevTools(); }
You may want to change this behavior. Enabling the dev tools will help you find and debug issues like the following:
- asar: Electron-Boilerplate will bundle your code into an asar file (Atom-Shell Archive) named app.asar. Read up on it here. In general, everything works fine, but it is certainly capable of causing some “file not found” bugs in your code. To help avoid these, use the Node.js variable __dirname, like so: “path = __dirname + “/file.html”.
Just the Beginning
Hopefully you have your app built, installed, and working. Hopefully your imagination is running with all the different desktop apps you can make using this technology. Have fun!
Here are some additional resources that will come in handy when learning Electron:
- GitHub Electron Docs: https://github.com/atom/electron/tree/master/docs
- GitHub Atom Editor, a large Electron app for you to learn from: https://github.com/atom/atom
- Awesome Electron, lots of useful Electron resources: https://github.com/sindresorhus/awesome-electron/blob/master/readme.md
- szwacz/electron-boilerplate: https://github.com/szwacz/electron-boilerplate